October 12, 2012

Buffalo Chicken Strips!

Hey everybody,

I'm sure that most people have tried one form or another of the traditional buffalo chicken wings with celery sticks and blue cheese dressing. The thing is, the level of typical spiciness from the buffalo sauce has never really appealed to my taste buds.


So I decided to make a version that was more in tune with how my ideal buffalo wings would taste. I brought the spiciness down and added a little bit of sweetness. I also made some sweet potato fries to accompany the dish and provide some starch to temper the heat of the chicken strips.

These are so delicious, and healthy, and I promise you won't be disappointed!


 Ingredients (buffalo sauce):
  • 1/2 cup apple cider vinegar
  • 1 tsp chili powder
  • 1 tsp chipotle chili powder
  • 1 tsp paprika
  • 1 tsp smoked paprika
  • 4 tsp garlic powder
  • 2 tbsp maple syrup (optional)
  • 2 tbsp extra virgin olive oil
  • 1/2 - 1 tsp sea salt to taste
  • 1/2 tsp cayenne pepper (optional)
Method (buffalo sauce):
  1. Simmer all ingredients together in a small saucepan over medium heat for about 10 minutes. I omitted the cayenne because I didn't want the sauce to be too spicy.
  2. Store in a mason jar in the refrigerator.

Ingredients (chicken strips):
  • 2 lbs boneless, skinless chicken thighs (organic), cut into strips
  • 1 cup of ground toasted almonds
  • 1/4 cup arrowroot powder
  • 1 tsp sea salt
  • 1/4 tsp freshly ground black pepper
Method (chicken strips):
  1.  Whisk together the ground almonds, arrowroot powder, salt and pepper. Toss the chicken strips in the breading until fully coated. Let stand for 30 minutes to allow the breading to adhere to the chicken.
  2. Preheat the oven to 425 degrees.
  3. Lay the chicken strips evenly on a lightly greased baking sheet.
  4. Bake for 30 minutes or until cooked through a golden brown.
  5. Let the chicken cool for 5-10 minutes and then toss in a bowl with 1/4 - 1/2 cup of the buffalo sauce until well coated.
  6. Serve with sweet potato fries, avocado, and some homemade blue cheese dressing (for a primal option).
Until next time!...

October 6, 2012

Paleo Crabcakes!

Hey guys!

Sorry I've been a bit AWOL for a while. I found that during the last few weeks while my hubby was away, it was harder to be inspired to cook new things for one person. But he's back! Finally! So I've been cooking up a storm this past week and have come up with a couple of new ideas I'd like to share with everybody.

The first recipe I want to share is a little indulgent due to the fact that it's a bit more expensive than I usually prefer. However, I wanted to try something special in honor of my hubby's return.

So I invented a paleo-friendly recipe for crabcakes! I served them with a yummy guacamole, and a primal option of lemon sour cream; they were so good!


Ingredients:
  • 2 13 oz cans of lump crab meat, drained well
  • 1/4 cup of ground almonds
  • 1-2 tbsp coconut flour
  • 3 eggs, beaten well
  • 1 tbsp extra virgin olive oil
  • 1/4 tsp celery seed
  • 1/2 tsp garlic powder
  • 1 tsp paprika
  • 2 tsp dried parsley
  • 1-2 tsp sea salt
  • 1 tsp whole peppercorns
  • oil for frying
Method:
  1.  Dump the crab meat into a big glass bowl. Add the ground almonds, coconut flour, and eggs and mix with a fork or your hands.
  2. Grind the spices in a coffee grinder or with a mortar and pestle (which is what I did!) and add to the crab meat mixture and incorporate fully.
  3. Preheat a large, heavy-bottomed skillet over medium heat and add either extra virgin olive oil or coconut oil, enough to cover the bottom of the pan, and heat through.
  4. Form the crab meat mixture into patties 3 inches in diameter and 1/2 inch thick. Fry in the pan in batches of 4 for about 3 minutes per side or until golden brown.
  5. Drain on a cooling rack and serve with salad, sweet potato fries, lemon wedges, and guacamole!
Until next time!...

September 16, 2012

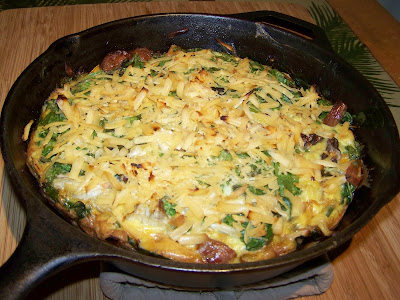
All Day Breakfast Frittata!

Hey Everyone!

So my hubby's away on a business related trip for a while and I am cooking for one...Sad day! It turns out there is a huge difference between cooking for one as opposed to two; especially when the other person is a very active young man!


I decided to make a frittata for breakfast this morning and ended up eating it for the whole day! It was a spur of the moment thing, but it ended up turning out really well and I wanted to share it with you.


Ingredients:
  • 1 small sweet potato, diced finely
  • 2 preservative-free sausages, diced
  • 2 tbsp extra virgin olive oil
  • 8 eggs
  • 1 cup of chopped greens
  • salt and garlic powder to taste
  • 1/4 cup smoked Gouda cheese, grated (optional)
Method:
  1. Preheat the oven to 420 degrees.
  2. Place the sweet potato chunks, sausage, and oil into a cast iron skillet and bake for 20 minutes or so until the sweet potatoes are soft.
  3. In the meantime, beat the eggs together and add the seasonings.
  4. Place the skillet onto medium heat on the stovetop, dump in the greens and pour in the eggs.
  5. Cook until the sides of the frittata are set and then sprinkle the cheese on top and place back into the oven and cook for an additional 20 minutes or until the center barely giggles when moved.
  6. Cool for at least 10 minutes before serving. You can cut and serve like a pie right out of the pan, or attempt to flip the frittata onto a plate and serve (good luck!).
Until next time!...

September 10, 2012

Zucchini Boats!

Hey there everybody!

I literally just made this recipe! I was scrounging around in my fridge for something to make and I realized I had some zucchini that needed using and some leftover chicken that also needed a final resting place =]

These zucchini boats are delicious and very healthy! Packed with protein and nutritious veggies, these make the perfect all in one dinner for almost any diet*.

Ingredients:
  • 2 largish zucchini
  • 1 can organic diced tomatoes
  • 1 onion, finely diced
  • 1/3 cooked chicken meat, diced (from whole roasted chicken)
  • 1 tbsp olive oil
  • 1 tbsp dried parsley
  • 2 tsp dried basil
  • 2 tsp garlic powder
  • 1 tsp oregano (all I had was Mexican oregano, so that's what I used)
  • sea salt and pepper to taste
Method:

Cut the zucchini in half lengthwise and then again width-wise, so that you have 8 quarters of the zucchini.

Scoop out the flesh, leaving a 1/4 inch border all the way around. This forms the "boat".

Place the boats in a glass baking dish and dice up the leftover zucchini guts.

Preheat a large heavy bottomed skillet over medium heat. Heat the olive oil and then saute the diced onion until translucent.

Add the chicken and the spices.

Drain the tomatoes well and add with the diced zucchini guts, cook until no excess moisture remains.

Fill the boats until the filling is mounded at the top.

Bake in a 425 degree oven until heated through and the zucchini boats are roasted, about a half hour.

Serve a la carte or with a fresh salad!
*For a vegan variation, omit the chicken. For a primal version, add some Parmesan cheese on top.


Until next time!...

September 5, 2012

Carnitas!


Hey guys,

This dish is inspired by all of the Mexican food I grew up with. Now that I'm married and had to move away from my hometown, there has been a gross shortage of really good Mexican food restaurants. So, like I do with most things, I wrote my own recipe for carnitas!

If you are unfamiliar with what carnitas are, they are cubes of some type of pork roast simmered in orange juice until shreddable and the liquid is gone; the meat starts to fry in it's own fat and gets all brown, caramelized, and crispy, yum!


You can use the meat as you like, but some of my favorite uses are burritos, tacos, or just over a fresh green salad!

Here it is:

Ingredients:
  • 2-3 lbs pork tip roast
  • 1 onion, finely diced
  • 2 tbsp bacon fat
  • 1 tbsp garlic powder
  • 1/2 tsp cumin
  • sea salt and pepper to taste
  • about 4 cups of orange juice
Method:
  1. Dice the pork roast into 1-2 inch cubes.
  2. Saute the onion in the bacon fat in a large heavy bottomed pan until translucent.
  3. Add the pork and the spices.
  4. Add enough of the orange juice to come up 3/4 of the way on the pork and bring to a boil.
  5. Continue to simmer on medium heat, shredding the pork with two forks as it cooks.
  6. Cook until the liquid evaporates, turn the heat up to medium high and fry the pork in the fat until brown and caramelized.
  7. Serve as a burrito filling, taco filling, or however you like!
Until next time!...

September 4, 2012

Hawaiian Pizza Chili (whatever's left in the fridge chili)

Alright Everyone!

This is the second part of my deconstructed Hawaiian pizza bread sticks and chili! This chili was so good I was eating it all weekend! What a great way to save the leftovers in the refrigerator from going bad and having to be thrown out. I must say, chilies and soups are wonderful edible garbage disposals, so to speak.

Anyways, one of the other reasons I love this recipe is that it's one of those "dump everything into one pot and cook" kind of dishes...meaning not a complicated cooking process and not a lot of clean-up afterwards!


It's also a good recipe in which to "hide" veggies or other nutritious foods for the sake of the picky eaters in your household, a.k.a. my hubby! Even though he could see some of the ingredients and asked me about them, he kept right on eating the chili because it's so good!


Here it is!:

Ingredients
  •  1 lb organic ground beef
  • 1 1/2 onions, diced finely
  • 2 tbsp bacon fat
  • 1 zucchini, grated
  • 3 carrots, grated
  • 1/4 of a fresh pineapple, diced finely
  • 1 cup frozen spinach
  • 1 can organic diced tomatoes
  • 1 tbsp garlic powder
  • 1 chipotle pepper, deveined and deseeded, diced
  • 2 tsp honey
  • 1 can organic tomato paste
  • salt and pepper to taste
  • 1 tbsp basil
  • 1 tsp oregano
  • 1/4 cup coconut flour
  • enough water to cover the mixture
Method:
  1. Saute the onions in the bacon fat in a heavy bottomed pot over medium high heat until translucent.
  2. Crumble the ground beef into the onions and break it up further with a spoon. Cook until the fat starts to render and the moisture is gone.
  3. Add the rest of the ingredients and enough water to cover the mixture.
  4. Bring to a boil and simmer on low heat for at least 1 hour.
  5. Serve with the pizza crust bread sticks! Enjoy!
Until next time!...

August 31, 2012

Pizza Crust Breadsticks!

Hey Peoples!

I usually only go grocery shopping every 2 weeks, we are at the end of the 2 weeks, and I need to go grocery shopping! As you might expect, I am trying to use up all the food I have left in the refrigerator. I hate throwing food out, so I came up with a couple of recipes that did justice to the leftovers in my fridge.

The first recipe I want to share is pretty simple. I had a partially baked pizza crust sitting in my freezer awaiting any toppings I wanted to put on it. The only problem was...we didn't feel like eating pizza!

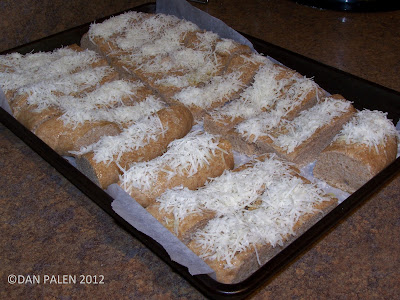
So here's what I did, I made a deconstructed version of Hawaiian pizza (my honey's favorite)! The first part of the deconstruction was to make bread sticks out of the pizza crust. I just cut up the crust into appropriate sized pieces, topped with Pecorino Romano cheese, and then baked like the regular pizza crust would have been.
 The resulting bread sticks were crunchy on the outside, pizza doughy on the inside, and a salty tang from the cheese...in a word: amazing!

The next part of the deconstructed pizza is yummy Hawaiian BBQ chili! But you will have to wait until Monday for that recipe!

All right, here is the recipe for the bread sticks:

Ingredients:
  • 1 recipe for soaked pizza crust, partially baked for freezer storage (6 minutes at 450 degrees), I used my mother-in-law's recipe and tweaked it for soaking purposes.
  • extra virgin olive oil
  • 1/2 - 1 cup of Pecorino Romano cheese, finely grated ( you could also used Parmesan)
  • sea salt
Method:
  1.  Thaw pizza crust at room temperature.
  2. Pre-heat oven to 425 degrees.
  3. Slice the pizza crust into bread stick sized pieces.
  4. Line a baking sheet with parchment paper and place the bread sticks on the pan with space in between each one.
  5. With a pastry brush, lightly brush each bread stick with the olive oil, sprinkle with the sea salt, and cover the tops with the cheese.
  6. Bake for 15 minutes or until the cheese is crispy.
  7. Serve with the Hawaiian pizza chili!

Until next time!...

August 30, 2012

Simple Pan-Cooked Chicken Thighs!

Hey Everyone!

So today, I was looking for something easy and all-purpose to make for me and my honey's lunches. I turned to a tried and true recipe for simple pan cooked chicken thighs.

3 ingredients and an easy cooking method, what more could you ask for! You can use these lovely pieces of chicken for a lot of different delicious lunch ideas. Today I sliced them and put them in California chicken wraps for the hubby's lunch, and mixed them with homemade guacamole/salsa and put them in lettuce leaf tacos for my lunch =] you could also slice them up over a salad or even serve them with some steamed/sauteed vegetables for a healthy dinner!

Easy and delicious, for two or a crowd, I highly recommend you try this yummy all-purpose chicken!

This recipe is appropriate for: paleo, primal, gluten-free, and GAPS diets

Serves 2 healthy appetites!
Ingredients:
  • 4-5 boneless, skinless chicken thighs (organic!)
  • sea salt and freshly ground black pepper
Method:
  1. Pre-heat a heavy bottomed pan (cast iron or stainless steel) over medium-high heat.
  2. When pan is hot, lay the chicken thighs in the pan so they are evenly spaced and not touching.
  3. Do not move them for at least 5 minutes! This is important for browning the meat. In the meantime, sprinkle with salt and pepper.
  4. Take tongs or a spatula and try to pry up one of the thighs, if it releases easily, the meat is ready to flip; if not, give them another minute and then try again.
  5. After flipping the chicken, season the other side. Once again, do not move the chicken for at least 5 minutes, or until the meat lets go of the pan.
  6. When both sides are nice and brown, turn the heat to medium-low and cook each side for another 5 minutes or until the fat is well rendered and crispiness is achieved!
  7. I usually check if the meat is done by cutting into the thickest part and seeing if there is any pink color left, if not, the chicken is ready!
  8. Let the meat rest for about 5 minutes and then serve however you prefer, enjoy!
Until next time!...

August 29, 2012

Hey there peeps!

So, I'm sure you have all been aware of hurricane Isaac battering the shores of the various gulf coasts. Well, suffice it to say that the hubby and I had to make some emergency preparations in case of power, water, and general utility outages. We stocked up on water and packed the important papers and sentimental junk in water tight boxes. But what I didn't realize is when you have committed yourself to a way of eating that does not include any canned food, boxed food, or packaged food that lasts on the shelf for months on end (you know the stuff I'm talking about!), it is incredibly tricky to figure out what to make that won't go bad for at least a few days.

In the end, I bought some packaged trail mixes without preservatives, beef jerky, made nut bars and a ton of granola!

I was recently inspired by a recipe called "skillet granola" (http://amoderngal.com/2012/08/14/skillet-coconut-granola/). Although I have made my own granola before, the method of cooking the grain was what caught my attention. The original recipe makes use of a cast iron pan on the stove top to toast the oats. It is much quicker than the oven cooked recipe I had been using; 10 minutes compared to at least an hour of cooking time! Basically what I did was to use my own granola recipe cooked by the cast iron skillet method.


The recipe is gluten-free and serves 2 people with leftovers...however, in light of preparing for the hurricane, I actually made the recipe about 3 times in a row and stored it in an airtight container!

Here it is:

Serving size: 1 cup

Ingredients:
  • 2 cups of gluten-free oats (such as Bob's Red Mill)
  • 1/2 cup of your choice of roasted or raw nuts (if roasted, do not add to mixture until the end)
  • 1/4 cup of raisins
  • 1/4 cup chocolate chips
  • 2 tbsp honey
  • 2 tbsp coconut oil/butter/olive oil
  • 1/8 tsp of salt
Method:
  1.  Preheat a medium size cast iron skillet over low-medium heat.
  2. When the pan is hot, add the coconut oil, melt, and coat the pan.
  3. Add the oats, salt, and the honey and mix with a spoon until everything is incorporated and coated with the coconut oil.
  4. Cook the mixture for about 10 minutes, stirring frequently. Cook until the granola is a light shade of golden. I ended up removing it from the pan before I really thought it was done, but it crisped up beautifully once I allowed it to cool for a few minutes.
  5. Serve with warm or cold raw milk, almond milk, or coconut milk, or eat like trail mix!
 Until next time...Enjoy!

August 28, 2012

Hello Everyone!

This is my first post on my new blog and I am so excited!

Just to tell you a little more about myself: I love cooking! Almost everything I do in my daily routine revolves around food in some way. If you knew just how much, you would think it was a little sad :) I also like to read, watch movies, and go places with my honey <3

Anyways, I'm starting this blog because I want to start sharing my recipes and food ideas with the world. I am also working on a cookbook that goes into a more detailed explanation of my food philosophy.

Thank you for visiting my blog and I hope you stick around to see some of the amazing things that are going to happen!

Love,
Lindsey